


Table of Contents
- What Is a Resistance Bar and How Does It Work
- Setting Up Your Resistance Bar: Anchoring and Positioning
- Adjustable Resistance Bar Tension: Finding Your Starting Level
- Resistance Bar Exercises for Upper Body Strength
- Lower-Body and Core Work with a Resistance Band Bar Workout
- Resistance Band Safety Tips and Common Mistakes
- Beginner Progression: Sets, Repetitions, and Workout Duration
- Frequently Asked Questions
Last Updated: October 13, 2026
What Is a Resistance Bar and How Does It Work
The band stores elastic energy: the harder you pull or push, the more it resists. This is variable resistance, tension increases as you extend further.
Unlike dumbbells or machines, it weighs almost nothing, fits in a bag, and works standing, sitting, or lying down, ideal for home workouts, office breaks, or travel.
At Health&Wellness, we've found that the Probar-Stretchbandplus delivers this exact combination: a lightweight bar with easy tension adjustment by twisting, plus the ability to perform full-body exercises anywhere. No setup required.
Resistance Bar vs. Resistance Band: Key Differences
The main difference is grip and stability. A resistance band is loose elastic in your hands; a resistance bar is rigid, giving you something solid to grip and control. In practice:
- Grip control: The bar provides a fixed point. Your hands stay stable. A loose band can slip or roll in your hands.
- Range of motion: The bar guides your movement in a straight line. Bands allow more unpredictable motion.
- Ease of use: The bar is simpler for beginners. You don't have to think about holding it correctly.
- Durability:
- Resistance feel: The bar creates smoother, more consistent tension throughout the movement.
Both build strength.
Setting Up Your Resistance Bar: Anchoring and Positioning
A resistance bar is a rigid shaft with a band running through, around, or into it, through a channel, clipped to an eyelet at each end, or looped over a groove near the grips.
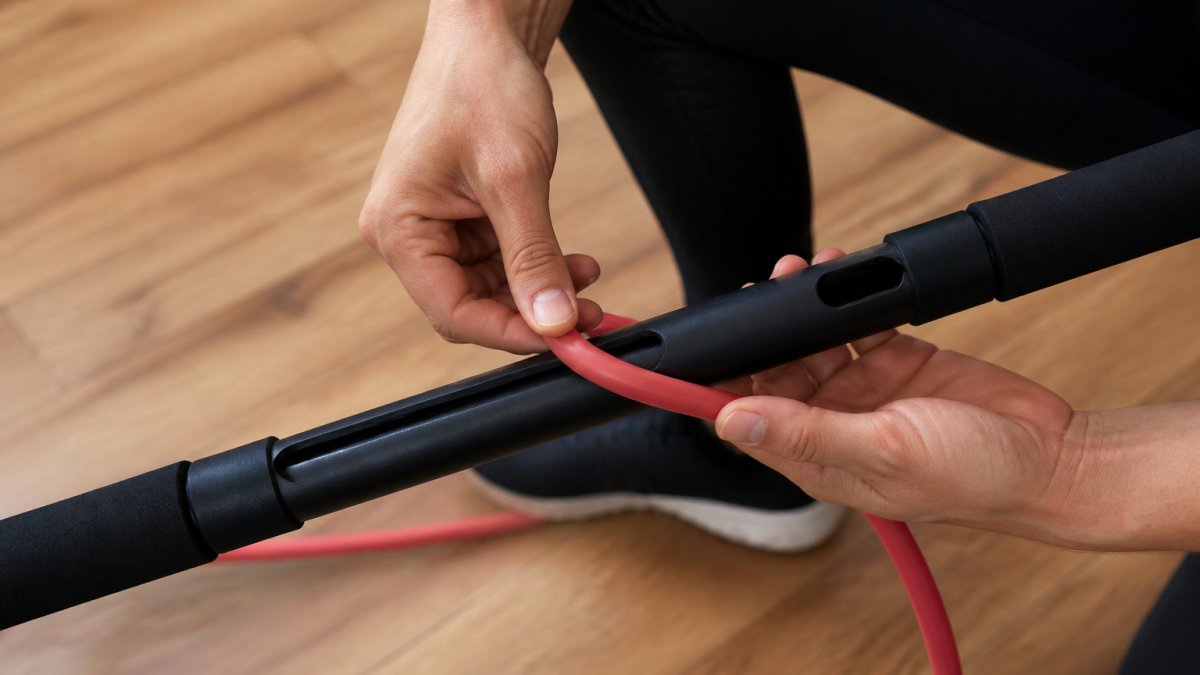
Step-by-step setup
- Inspect the band first. Look for nicks, thinning, discoloration, or white stress marks. A frayed or sticky band should be retired, not stretched.
- Thread or clip the band. Feed it through the bar channel or attach it to the end clips per your model. Keep it centered so equal lengths hang on each side, an off-center band pulls the bar sideways.
- Seat the connection. Pull gently until the band sits flush, then twist or snap any end caps or collars into place. Tug once at moderate effort to confirm nothing slips.
- Check the band's path. It should run clear of sharp edges, zippers, watch bands, and rings, anything that rubs shortens its life.
- Set your stance. Feet hip-width apart, knees soft, ribs stacked over hips. Grip shoulder-width with wrists neutral.
- Test tension before your first rep. Pull through a short range at low tension. If the band twists, bunches, or the bar rotates, reset before adding resistance.
Positioning for each training angle
- Standing: Feet hip-width apart, weight balanced, core braced. Best for presses, rows, squats, and chops.
- Seated: Sit tall, back supported, feet flat. Useful for upper-body work and balance issues.
- Half-kneeling: One knee down, other foot forward. Limits hip cheating and makes core and shoulder work harder.
- Supine: Knees bent, feet flat, lower back neutral. Best for leg curls and dead-bug core work.
Choosing your grip width
Grip width changes which muscles work: wider shifts emphasis to chest and shoulders, narrower to arms and back. Shoulder-width is the default. If your hands fatigue first, widen the grip or reduce tension rather than gripping harder.
Adjustable Resistance Bar Tension: Finding Your Starting Level
Tension determines how hard the exercise feels. Too light, and you won't build strength; too heavy, and your form breaks down.
To understand how to use resistance bar tension, start at the lowest setting, twisting the bar counterclockwise to loosen the band. Perform 10-15 repetitions. If it feels easy, twist clockwise to increase tension, each quarter-turn increases resistance noticeably.
Aim for a tension where the last 2-3 reps feel challenging but doable with good form. As you get stronger, add tension every 2-3 weeks, this progressive overload builds strength.
Resistance Bar Exercises for Upper Body Strength
Your upper body includes chest, back, shoulders, and arms. The resistance bar works all these areas effectively.
Chest Press and Row Movements
The chest press targets your pectorals and front shoulders. Hold the bar at chest height with elbows bent, push forward until your arms straighten, then return with control. Perform 10-15 repetitions.
The row works your back and rear shoulders. Hold the bar at hip height with arms extended, pull it toward your chest, squeeze your shoulder blades together at the top, then return. Do 10-15 repetitions.
Both strengthen the muscles that support good posture.
Shoulder and Overhead Movements
The overhead press builds shoulder strength and stability. Stand with feet hip-width apart, hold the bar at shoulder height, press overhead until your arms straighten, then lower back to shoulder height. Do 10-15 repetitions.
The lateral raise targets the side of your shoulders. Hold the bar in front of you with arms straight, raise it out to your sides until your arms are parallel to the floor, then lower slowly. Perform 10-15 repetitions.
Overhead movements improve functional strength.
Lower-Body and Core Work with a Resistance Band Bar Workout
Your lower body includes glutes, quadriceps, hamstrings, and calves; your core is your abdominal muscles and lower back. Both need regular training.
Squats, Leg Curls, and Glute Activation
The squat is the foundation of lower-body training. Hold the bar at chest height or across your shoulders, chest up and core tight.
The leg curl works your hamstrings. Lie on your back with knees bent and feet flat, loop the band around one foot, pull your heel toward your glutes, then return. Do 10-15 repetitions per leg.
Glute activation exercises wake up your largest leg muscle. Stand facing a wall for balance, holding the bar in front of you.
Core Engagement and Abdominal Exercises
Your core stabilizes your entire body during movement.
The standing chop works your obliques. Hold the bar at one shoulder with arms bent, rotate your torso to move the bar diagonally down toward the opposite hip, then return. Do 10-15 repetitions per side.
The dead bug targets your core while lying down. Lie on your back with arms extended toward the ceiling, lift one leg and straighten it while keeping your lower back pressed to the floor, then return. Alternate legs. Perform 10-15 repetitions per leg.
These movements improve posture.
Resistance Band Safety Tips and Common Mistakes
A resistance bar adds a rigid shaft, a connection point, and a longer lever arm, each changes the safety picture. Run this checklist before every session.
Pre-workout safety checklist
- Band integrity: Inspect the full length for nicks, cracks, thinning, or white stress lines. Bands degrade over time, especially in sunlight or heat. Replace any damaged band.
- Connection security: Confirm the band is fully seated in the channel or clipped to the end points. Tug at moderate effort; if it slides, twists, or the clip opens, stop and reset.
- End caps and collars: Verify caps, collars, or locking rings are tight, these fail first when loose.
- Grip check: Dry your hands and wipe the bar down if you use lotion or have sweaty palms. A bar that slips under tension is the most common bar-specific injury.
- Clear the space: Give yourself an arm's length plus the stretched band length in every direction. Remove furniture, pets, and children from the swing zone.
- Footwear and floor: Wear shoes with grip on hard floors. Socks on tile or hardwood are a slip risk during standing rows and squats.
Bar-specific mistakes to avoid
- Letting the band go under tension. A released stretched band becomes a projectile. Return the bar to the start position before releasing.
- Twisting the bar mid-rep to change tension. Adjust tension between sets. Twisting under load can unseat the band or end caps.
- Using a bar with a worn band because the bar still looks fine. The band is the wear item; the bar outlasts several bands.
- Gripping harder to compensate for too much tension. Grip fatigue shows up as the bar rotating in your hands, lower tension rather than squeezing harder.
- Pressing or pulling through a locked-out joint. Stop just short of full lockout on presses and rows to keep tension on the muscle, not the joint.
- Rounding the lower back during rows and chops. Brace the core before each rep, and reduce tension if you cannot hold a neutral spine.
- Training the same muscles on back-to-back days. Elastic resistance still creates muscle damage. Give each muscle group at least 48 hours before training it again.
Form cues that apply to every bar exercise
- Breathe out on the effort, in on the return. Holding your breath spikes blood pressure and causes dizziness.
- Move at a controlled tempo, roughly two seconds out and two seconds back. Elastic resistance rewards control and punishes momentum.
- Keep wrists neutral. A bent wrist under tension is a fast route to tendon irritation.
- Stop at sharp pain. Muscle fatigue and mild burning are expected. Joint pain, tingling, or numbness are not.
If you have a history of shoulder, back, or wrist injury, or are returning after a long break, check with a qualified professional first. Most people can start safely with light tension and the checklist above.
Beginner Progression: Sets, Repetitions, and Workout Duration
Progression is how you build strength over time. Start conservatively and increase gradually.
Beginners should perform 2-3 sets of 10-15 repetitions per exercise, resting 30-60 seconds between sets.
Your first workout should take 20-30 minutes total, including warm-up and cool-down.
Building strength with a resistance bar is straightforward once you understand the basics.
American College of Sports Medicine guidelines on resistance training recommend strength training 2-3 times per week for all adults.
Start with light tension, perfect your form, and progress gradually. Within 8-12 weeks, you'll notice improved strength, better posture, and increased energy. Mayo Clinic recommendations for strength training safety emphasize that consistency matters more than intensity, a fact that makes the portable, accessible design of resistance bars ideal for sustainable fitness.
Shop the Probar-Stretchbandplus at Health&Wellness today and start your full-body strength journey from home, the office, or anywhere life takes you.
Frequently Asked Questions
How do you use a resistance bar for a full-body workout?
A resistance bar works for full-body training by combining upper-body presses and rows, lower-body squats and leg movements, and core exercises. Start with lighter resistance, complete 10-15 repetitions per exercise, and rest 60 seconds between sets. Perform 2-3 sets of each movement 3-4 times per week. The bar's adjustable tension means you can progress by increasing resistance as strength builds, making it effective for beginners through advanced users.
How do you adjust the resistance on an adjustable resistance bar?
Most adjustable resistance bars, including the Probar-Stretchbandplus, use a simple twist mechanism. Rotate the bar to tighten or loosen the internal mechanism, which changes band tension instantly. Start with lighter resistance by twisting counterclockwise, then gradually increase by twisting clockwise as your strength improves. Test the tension before each exercise by pulling the band slightly, you should feel moderate resistance without strain.
How do you anchor or hold a resistance bar safely?
Secure your bar by anchoring it under your feet when standing. Always check your anchor point is stable before applying force. Maintain a neutral spine, engage your core, and use a controlled movement throughout the entire range of motion to prevent injury.
Can resistance bar exercises help build strength?
Yes. Resistance bars create muscle engagement through progressive tension that forces your muscles to work harder over time. Consistent use, 3-4 workouts weekly with proper form and increasing resistance, builds strength in your shoulders, back, arms, legs, and core. Resistance training improves grip strength and functional fitness, making it particularly beneficial for seniors and those recovering from physical therapy.


